
Behaviors
An introduction to WADE's behavior system
Let's start making a brand new app. Although not particularly original (it's going to be a match-3 game like Bejeweled), it will be useful to demonstrate some of WADE's features.
So far we've been defining event callbacks for each object separately, and we've coded all the logic that controls the object's behavior in member functions of the object itself. While this is a quick approach that is OK for small functions, making a whole game or app like this would make your code very messy very quickly, because you'll want to reuse some code across different objects.
This is where WADE's behavior system comes in handy. Behaviors are functions that define how an object should behave: how it should respond to events, and what it should generally do. You can assign behaviors to scene objects, and each scene object may have more than one behavior. When a scene object receives an event, it passes it on to all of its behaviors.
This may simplify things in many cases. Say, for example, that many objects in your app cycle through a set of animations; in addition, the user can control one of these objects and move it around. In this scenario you could have a cycleAnimation behavior, for example, that would be assigned to all the objects that need to do that; the user-controlled object would have that same behavior plus an userControl behavior.
Basically this is a way to minimize code duplication, to promote encapsulation, and to keep your code tidy even when your project grows, since behaviors can be easily coded in separate files.
First of all, let's create our main app file. Soon after that, we'll create a behavior file. I'm going to put the behavior file in 'behaviors/match3Item.js', which is why I reference that in our App's load function:
App = function()
{
    this.load = function()
    {
        // load behavior
        wade.loadScript('behaviors/match3Item.js', 0, 1);

        // load sprites
        for (var i=0; i<6; i++)
        {
            wade.loadImage('data/item' + i + '.png');
        }
        wade.loadImage('data/cursor.png');
    };

    this.init = function()
    {
    };
};
Before writing our init function, let's have a look at the load function: we are loading the behavior script from an external file, and we're using two additional arguments: the first one (which we set to 0), is a callback function to execute when the script is finished loading; in this case we don't care about that, and we're passing in a falsy value. The second parameter, on the other hand, is one that we care about: by setting it to a truthy value, we're forcing WADE to reload the script every time the app is loaded. If we didn't do this, the script would be cached by the browser the first time it's loaded, and would be loaded from the browser's internal cache ever time after the first time. This is something that you probably want to do when you release your app (because things load much quicker from the cache, and you save bandwidth if the app is hosted on a remote server). However, during development you often want to change your scripts and see what you're doing, hence the truthy value.
We are also loading a set of sprites: there are 6 sprites that we're going to use for our match-3 items, and 1 that we're going to use as a cursor, to indicate the currently selected item. You can right-click on the images below to save them to your project's data folder.


Note that I could have done this more efficiently by putting all the sprites in a single sprite sheet. Then I would have created a set of one-frame animations, and assigned those animations to sprites. We would have saved some bandwidth and loading time, but here we just want to keep things simple - just keep in mind that that would be a nice and easy optimization to make in a real application.
Now let's start writing our init function:
    this.init = function()
    {
        // define a grid
        this.numCells = {x: 8, y: 8};
        this.cellSize = 40;
        this.numItemTypes = 6;

        // create a set of game items
        this.items = [];
        for (var x=0; x < this.numCells.x; x++)
        {
            this.items[x] = [];
            for (var y=0; y < this.numCells.y; y++)
            {
                this.items[x][y] = this.createRandomItem();
                this.items[x][y].gridPosition = {x: x, y: y};
                wade.addSceneObject(this.items[x][y]);
            }
        }
    };
In the init function we're defining some properties of the game's grid (we're going to have an 8x8 grid with 6 different types of sprites).
The next step is to create a set of objects that represent our match-3 items on the grid. First of all, at line 9, we're creating an empty array, which we'll use to store all our scene objects. This is going to be a 2-dimensional array (it makes sense since our objects will be arranged in a 2-dimensional grid). This is why, at line 12, we're saying that each element of the this.items array is itself an array.
At line 15 we're calling a createRandomItem function (that we're going to define in a minute), that will return a scene object that we can use. We are then extending this scene object by assigning a gridPosition property to it: this is an object with x and y fields representing the indices of its cell in the grid - this is not a set of world-space positions, and not a property that WADE will use or understand: it's just something that we are going to use in this app's other functions.
So let's define a couple of other functions in our main app file: the createRandomItem function referenced above, and another function, that we're going to call gridToWorld, that will convert cell indices into world-space coordinates:
    this.createRandomItem = function()
    {
        var itemType = Math.floor(Math.random() * this.numItemTypes);
        var sprite = new Sprite('data/item' + itemType + '.png');
        sprite.setSize(this.cellSize * 0.95, this.cellSize * 0.95);
        var object = new SceneObject(sprite, Match3Item);
        object.itemType = itemType;
        return object;
    };

    this.gridToWorld = function(gridCoords)
    {
        var worldX = (gridCoords.x - this.numCells.x / 2 + 0.5) * this.cellSize;
        var worldY = (gridCoords.y - this.numCells.y / 2 + 0.5) * this.cellSize;
        return {x: worldX, y: worldY};
    };
In createRandomItem we are selecting an item type using random numbers, and then using the corresponding image to create a sprite object. After setting the size of this sprite object (a bit smaller of the cell size, 95% of it to be precise), we are creating a scene object with it.
This is the important bit: when creating the scene object, we are assigning it both a sprite and a behavior (the second argument: Match3Item). We are also storing the item type in the scene object itself.
Note that we haven't specified a position for the objects in the scene: we have only created this gridPosition member for them, which is a pair of integer numbers that represent the index of the object's cell in the grid, but we haven't assigned any world-space coordinates to the objects. And that's because we're going to do that in their Match3Item behavior.
Now let's create our behavior, like this, in behaviors/match3Item.js:
Match3Item = function()
{
    this.onAddToScene = function()
    {
        var worldPosition = wade.app.gridToWorld(this.owner.gridPosition);
        this.owner.setPosition(worldPosition);
    };
};
//@ sourceURL=match3Item.js
Our Match3Item object (or function) has an onAddToScene function that will be called automatically by WADE when the parent scene object gets added to the scene. In this function we're looking at the gridPosition property of the behavior's parent, converting it to a world space position, and setting that as the position of the parent object.
In fact, this is quite important: from a behavior function, you can always reference the parent object as this.owner.
Also note the //@ sourceURL tag at the end, which we need if we want to debug this behavior.
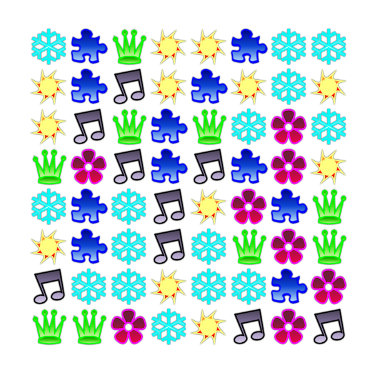
You can now save your files and run your app, and you should see something like this:
And if you refresh your browser, all those icons will appear in a different order. That's because in javascript, unlike most other languages, random numbers are automatically seeded.
Of course now we want to move these little icons around. Typically all match-3 games implement two types of controls, that can be used interchangeably to swap adjacent icons:
- you click an item: if no items were selected, you select this item - a cursor appears around it. You then click another item: if it's adjacent to the previously selected item, you swap the two items. Otherwise, you just select the new item.
- you click an item, move your mouse to one direction, then release your mouse button: this causes your item to be swapped with an item next to it, in the direction of your mouse movement.
First of all, let's add a function to our main app file called swapItems:
    this.swapItems = function(itemA, itemB)
    {
        // store current world positions
        var worldPositionA = itemA.getPosition();
        var worldPositionB = itemB.getPosition();

        // store current grid positions
        var gridPositionA = wade.cloneObject(itemA.gridPosition);
        var gridPositionB = wade.cloneObject(itemB.gridPosition);

        // swap world positions
        itemA.moveTo(worldPositionB.x, worldPositionB.y, 200);
        itemB.moveTo(worldPositionA.x, worldPositionA.y, 200);

        // swap grid positions
        itemA.gridPosition = gridPositionB;
        itemB.gridPosition = gridPositionA;
    };
If you have used javascript for a while you'll know this already, but I'd like to point out what's going on with the wade.cloneObject calls at lines 8 and 9. In javascript assigning an object to a variable actually assigns a reference to it, no a copy of the object itself. That is to say that this code:
var a = {myValue: 1};
var b = a;
a.myValue = 2;
alert(b.myValue);
will show a message that says '2', and not '1'. Sometimes, however, you'll want to copy objects themselves and WADE provides and easy way to do this with its cloneObject method. So:
var a = {myValue: 1};
var b = wade.cloneObject(a);
a.myValue = 2;
alert(b.myValue);
will actually output '1'.
WADE methods that return objects, however, like the getPosition method above, always return a copy of some internal WADE object. This means the, in the code for swapItems, you are free to set worldPositionA.x and .y to whatever you like, without actually changing the position of itemA. If you do want to change its position, you call setPosition.
Now is a good time to save your project and see whether this swapItems function. But how do I test it if I haven't called from my code, you may ask. We are going to test it through your browser's console (see the debugging tutorial).
In your console you can execute any commands immediately. Remember that wade is a global object, and that it gives you access to your app through wade.app. So in the console you can type:
wade.app.swapItems(wade.app.items[0][0], wade.app.items[1][0]);
Now that we know that this is working correctly, we can start using it. We need to know which objects the user is clicking, and we'll do that by editing the object's behavior to look like this:
Match3Item = function()
{
    this.onAddToScene = function()
    {
        var worldPosition = wade.app.gridToWorld(this.owner.gridPosition);
        this.owner.setPosition(worldPosition);
        wade.addEventListener(this.owner, 'onMouseDown');
    };

    this.onMouseDown = function()
    {
        wade.app.onItemClick(this.owner);
    };
};
//@ sourceURL=match3Item.js
At the end of onAddToScene we have registered the owner to receive 'onMouseDown' events. When the owner receives an event, its behaviors receive it as well. So we have added an onMouseDown function to handle this event. In this function we just inform the main app object that the owner has been clicked.
In the main app file we now want to define this onItemClick function, but first of all we need a cursor object to display on top of the selected item. Let's create it at the end of our init function:
  // create a cursor to select items
  var cursorSprite = new Sprite('data/cursor.png');
  cursorSprite.setSize(this.cellSize, this.cellSize);
  this.cursor = new SceneObject(cursorSprite);
  wade.addSceneObject(this.cursor);
  this.cursor.setVisible(false);
Nothing special here: we're creating a scene object as usual and adding it to the scene. The only difference is that we are also hiding it, by calling setVisible(false). Because we don't want it to appear until the user has clicked something.
Now let's create an onItemClick function, together with a selectItem function:
    this.onItemClick = function(object)
    {
        // if there was no item selected, select this one
        if (!this.selectedItem)
        {
            this.selectItem(object);
        }
        else
        {
            // if we've clicked the previously selected item, deselect it
            if (this.selectedItem == object)
            {
                this.selectedItem = 0;
                this.cursor.setVisible(false);
                return;
            }
            // check whether the previously selected item is next to this item
            var dx = Math.abs(this.selectedItem.gridPosition.x - object.gridPosition.x);
            var dy = Math.abs(this.selectedItem.gridPosition.y - object.gridPosition.y);
            if ((dx == 1 && dy == 0) || (dx == 0 && dy == 1))
            {
                // they're next to each other, so swap them
                this.cursor.setVisible(false);
                this.swapItems(this.selectedItem, object);
                this.selectedItem = 0;
            }
            else
            {
                // they aren't next to each other, so select the new item
                this.selectItem(object);
            }
        }
    };

    this.selectItem = function(object)
    {
        this.selectedItem = object;
        // show the cursor
        this.cursor.setPosition(object.getPosition());
        this.cursor.setVisible(true);
    };
Hopefully these functions should be self-explanatory, so I won't go through them. Now you can save and try your app, and you should be able to control you match-3 items with your mouse / touch-input / whatever.
If you try it for a while, you'll notice that there is a potential problem when you try to quickly swap items while one of them is already being swapped. This is possible because the swapping isn't instantaneous, as we use moveTo.
In reality, you don't want the user to be able to do that. You probably just want to ignore user input when things items are moving on the grid, even when later on we'll have items falling down from the top. Or maybe you do, it's up to you, but for this tutorial let's assume that you don't.
We can achieve this very quickly, but keeping track of how many items are moving at any one time. At the top of our init function, were we are defining the grid properties, add this line:
this.movingItemsCount = 0;
At the end of swapItem add this (since we're moving two items in that function):
        // increment moving items count
        this.movingItemsCount += 2;
Now in your behavior you should define an 'onMoveComplete' function like this:
    this.onMoveComplete = function()
    {
        wade.app.movingItemsCount--;
    };
And finally, right at the top of your onItemClick function:
        // if there are other items moving, ignore this event
        if (this.movingItemsCount)
        {
            return;
        }
This is probably all you need to know about WADE's behaviors. In the following tutorials we'll finish this simple game, while covering some more of WADE's features.
Try it right here
As the code of our project is getting larger, I'm not including the live editor here, as it would be impractical. But here's what your app should look like at the moment. It's still the full interactive app, so you can actually swap items.

