
JavaScript Flow Free Tutorial
This is a step-by-step guide to creating a simple flow-style game with WADE. This game uses exclusively vector graphics (no bitmap-based resources). You can download the full source code here.
1. Getting ready
Let's start by creating a new folder somewhere, and copying the WADE files into it. At the time of writing, the latest version of WADE is 1.0.1, so that's the one we're going to use. So download the zip file from clockwork chilli's website, and extract wade_1.0.1.js (or a newer version), index.html and style.css into your game folder. Next, we are going to create a new, empty file in this folder, called flow.js, which is going to contain our game. Now let's edit index.html and change the line that says:
// wade.init('test.js');
To:
wade.init('flow.js');
And in flow.js we are going to create our WADE App. So:
    App = function()
    {
    };
Inside the App function, we are going to create an init function, like this:
    App = function()
    {
        this.init = function()
        {
        };
    };
Note that, since we are going to use vector graphics only, there is no need for a load function to load images.
2. Main menu
Let's start by creating our main menu, where users will be able to select which level they want to play. To keep the logic of the main menu separated from the main game logic, I'm going to create the menu in a new function, that I shall name createMainMenu. Then, in the init function I call this function:
    this.init = function()
    {
        this.createMainMenu();
    };

    this.createMainMenu = function()
    {

    };
The best thing about using vector graphics, is that we don't have to use a fixed resolution for our assets. Instead, we can (and should) resize our assets depending on the size of the screen. So let's define a couple of variables in the createMainMenu function:
    var screenWidth = wade.getScreenWidth();
    var screenHeight = wade.getScreenHeight();
The first thing we need in our main menu, is a nice background. We could use a solid color, but to do something different and to give a more professional feel to our game, we are going to use a gradient (dark gray at the top, black at the bottom). We can do so using a predefined draw function provided by WADE:
    // create background gradient
    var backSprite = new Sprite();
    backSprite.setSize(screenWidth, screenHeight);
    backSprite.setDrawFunction(wade.drawFunctions.gradientFill_({x: 0, y: 1}, ['#444', '#000']));
    var backObject = new SceneObject(backSprite);
    wade.addSceneObject(backObject);
We have made the background sprite big enough to cover the whole screen, but if you try the game now in your favorite browser (by opening index.html and if it doens't work, make sure that you have set up your browser to access local files), you'll see that it's smaller than the browser window. This is because the sprite is created as soon as the game is initialized, and at that time, the size of the main canvas is whatever was set in the index.html and style.css files. The default value is 800x600 pixels. After the game is initialized, the canvas is resized to fill the whole screen, but we haven't told WADE what to do when the canvas is resized, so the background sprite is still always 800x600 big. We can change this quite easily by adding another function to our App, to handle onResize events:
    this.onResize = function()
    {
        wade.clearScene();
        this.createMainMenu();
    };
So when the window is resized, we simply clear the scene, and recreate the main menu. This is a lazy way of handling things (we could have decided to get all the objects in the scene and resize them according to the new screen size, instead of deleting and recreating them). However the resize event doesn't occur very often (in fact, it happens only once in most cases), and it doesn't really matter if it takes a few milliseconds more than it should.
If you try the game now, you'll see that the background covers the whole screen. And if you resize your browser's window, it will be resized accordingly.
It's now time to create a button that the player will press to start the game. Rather than defining a fixed size for our button, we shall make it as big as 20% of the screen width, or screen height (whichever is smaller). So in createMainMenu:
    var buttonSize = Math.min(screenWidth, screenHeight) / 5;
    var buttonSprite = new Sprite();
    buttonSprite.setSize(buttonSize, buttonSize);
    var button = new SceneObject(buttonSprite);
    wade.addSceneObject(button);
And to draw this sprite, I am going to use a predefined draw function provided by WADE, called drawRect_ that takes two parameters: a color, and a line width.
buttonSprite.setDrawFunction(wade.drawFunctions.drawRect_('white', 3));
Let's also add another sprite to this button object, right in the middle, to show which level it is for. Let's create a text sprite and, again, rather than using a fixed size for the font, let's just make it half the height of the button:
    var levelText = new TextSprite('1', (buttonSize / 2) + 'px Arial', 'blue', 'center');
    button.addSprite(levelText, {x:0, y: buttonSize / 6});
As you can see I'm also adding an offset to the text sprite (buttonSize / 6), to make it appear roughly in the center of the button. I need to do this because the position of text sprites is defined relative to the text baseline, not relative to the vertical center of the text sprite. How much it needs to be moved down is hard to calulate exactly, and ultimately depends on the particular type of font that is being used. However (height / 6) is generally a good approximation.
Of course we want more than one button: let's make 9, arranged in a 3x3 grid:
    // create level buttons in a 3x3 grid in the middle of the screen
    var gridSize = 3;
    var buttonSize = Math.min(screenWidth, screenHeight) / 5;
    var cellSize = buttonSize * 1.2;
    for (var i=0; i < gridSize; i++)
    {
        for (var j=0; j < gridSize; j++)
        {
            // create a sprite for the border of the button
            var buttonSprite = new Sprite();
            buttonSprite.setSize(buttonSize, buttonSize);
            var x = (i - gridSize/2 + 0.5) * cellSize;
            var y = (j - gridSize/2 + 0.5) * cellSize;
            buttonSprite.setDrawFunction(wade.drawFunctions.drawRect_('white', 3));

            // create a scene object for the button
            var button = new SceneObject(buttonSprite, 0, x, y);
            wade.addSceneObject(button);

            // add text to show which level the button is for
            var levelText = new TextSprite('1', (buttonSize / 2) + 'px Arial', 'blue', 'center');
            button.addSprite(levelText, {x:0, y: buttonSize / 6});
        }
    }
And of course, we don't want all buttons to show '1', but numbers from 1 to 9. In fact, we want to assign a levelId to each button object, and use that for the text:
    button.levelId = j * gridSize + i + 1;
    var levelText = new TextSprite(button.levelId, (buttonSize / 2) + 'px Arial', 'blue', 'center');
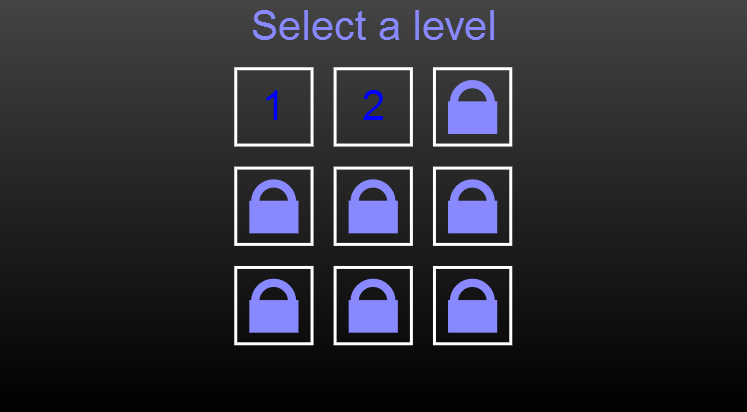
To make it clear that the player is supposed to press a button, let's add some more text at the top of the screen. Once again, the position and size of the text will be relative to the screen height (not fixed values):
    // tell the player what to do
    var textSprite = new TextSprite('Select a level', (screenHeight / 10) + 'px Arial', '#88f', 'center');
    wade.addSceneObject(new SceneObject(textSprite, 0, 0, -screenHeight / 2 + screenHeight / 10));
3. Loading level data
Now we want to be able to click the menu buttons to actually start a level. We are going to need some level data: for each level we need to define a grid, that contains two dots of each color. We are going to represent this grid as a bidimensional array (of size 6x6), and to keep our code tidy, we are going to define it in separate data files. These files are going to be in json format and will look like this (0 indicates an empty space, other numbers indicate a dot of a certain color):
[[1,0,0,0,1,2],
 [0,0,0,0,3,0],
 [3,2,0,0,0,0],
 [0,0,0,0,0,4],
 [0,0,0,0,5,6],
 [4,5,6,0,0,0]]
I am going to create a new sub-folder called levels inside our project's main folder, and I'm going to save the data above in a file called 1.json. If you aren't familiar with it, JSON (JavaScript Object Notation) is a subset of javascript that is extremely useful to store data in a compact, yet easy to understand format. The best thing about it, is that a valid JSON object is also a valid JavaScript object, which means that you don't need to parse JSON files if you're using JavaScript: you can simply use them as they are.
But we still have to load this data file, and we are going to do so using an asynchronous loading function provided by WADE (wade.preloadJson). I could have loaded all the data files in the load function of our App (and in fact, it would have made more sense to put the data for all the levels in the same file, to reduce the number of connections to the game's server), but I'm doing it like this to show you how you can load data in the background, while the game is running. If you had many levels, this would be a sensible approach, because you would only transfer the data that the player needs, reducing the bandwidth requirements for your game. For 9 levels, it makes little sense but it serves to prove a point.
So after creating each button, let's make it clickable (at the bottom of our for loop):
    // make buttons clickable
    button.onMouseUp = function()
    {
        wade.app.loadLevel(this.levelId);
    };
    wade.addEventListener(button, 'onMouseUp');
And let's create a loadLevel function in our App:
    this.loadLevel = function(levelId)
    {
    };
In this function we want to remove all the objects from the scene, and replace them with some text that says that we are going to load the level data. In fact, we also want to recreate a background object, in exactly the same way as we did before, but this time putting it on a different layer (layer 5) so that it doesn't need to be redrawn every time the game grid changes:
        wade.clearScene();
        var screenWidth = wade.getScreenWidth();
        var screenHeight = wade.getScreenHeight();

        // create background gradient
        var backSprite = new Sprite(null, 5);
        backSprite.setSize(screenWidth, screenHeight);
        backSprite.setDrawFunction(wade.drawFunctions.gradientFill_({x: 0, y: 1}, ['#444', '#000']));
        var backObject = new SceneObject(backSprite);
        wade.addSceneObject(backObject);

        // create loading text
        var loadingText = new TextSprite('Loading level...', (Math.min(screenWidth, screenHeight) / 10) + 'px Arial', '#88f', 'center');
        var loading = new SceneObject(loadingText);
        wade.addSceneObject(loading);
Before we go ahead and actually load the level data, we should stop to consider what happens now if the screen is resized while the "loading level" text is on the screen. Because of the way we are handling the resizing, everything is going to be removed from the scene, and the createMainMenu function is going to be executed (you can try this by resizing your browser window). Clearly this isn't what we want. We need a new variable to keep track of our game state, so that we can do different things to handle the resize event, depending on what is going on: what we are doing now is perfectly fine if we are in the main menu, but it doesn't work otherwise. So at the top of our App function:
var gameState;
Then in the createMainMenu function:
gameState = 'mainMenu';
And in the loadLevel function:
gameState = 'loading';
So in our App's onResize function we can use this variable:
        if (gameState == 'mainMenu')
        {
            wade.clearScene();
            this.createMainMenu();
        }
And we can do something else if we are in the loading game state. But what do we do exactly? We could do the same thing, i.e. delete everything and call loadLevel again, but that would be a problem, because we are loading data asynchronously. Instead, we are going to handle the resizing for each object that is in the scene separately (which is not too bad, since we only have two objects in the scene while loading: the background, and the loading text). For the background object, we just want to resize it to fill the screen:
    backObject.onResize = function(eventData)
    {
        this.getSprite().setSize(eventData.width, eventData.height);
    };
    wade.addEventListener(backObject, 'onResize');
For the text, we just want to change the font:
    loading.onResize = function(eventData)
    {
        this.getSprite().setFont((Math.min(screenWidth, screenHeight) / 10) + 'px Arial');
    };
    wade.addEventListener(loading, 'onResize');
Now you can play with this a bit by resizing your browser's window while in the loading state. It's quite cool. And now we're ready to load the level data, like this:
    var levelFile = 'levels/' + levelId + '.json';
    var level = {};
    wade.preloadJson(levelFile, level, function()
    {
        // level loaded, do something with level.data
    });
We are creating an object (called level), and we are passing it to the preloadJson function. When WADE is finished loading, it is going to execute the function that we have passed to preloadJson, and at that point, our level object will contain a data field, with the contents of our json file (in this case, the bidimensional array that describes where are the dots in the level grid).
4. Setting up the grid
Now that we have loaded level data, we want to remove that text that says "Loading level" and set up the game grid. We are going to create a startLevel function, that takes the level data as the only parameter. So after the call to wade.preoadJson():
    wade.removeSceneObject(loading);
    wade.app.startLevel(level.data);
And we add our new function to the main App function. We want to store the level data in a member of the App function, so it's easier to access from other functions too. We also change the game state here:
    this.startLevel = function(levelData)
    {
        this.levelData = levelData;
        gameState = 'playing';
    };
We need to create the grid to play the game here, but how big should it be? We know that it's a 6x6 grid, because the level data defines a 6x6 array. But rather than hard-coding the number 6 here, let's just use the size of the level data array for the size of the grid:
var numCells = levelData.length;
But the main question is: how big should each cell be? We want to fill as much of the screen as possible, so we take the width or height of the screen (whichever is smaller), divide it by the number of cells in the grid, and that is our cell size.
    var minSize = Math.min(wade.getScreenWidth(), wade.getScreenHeight());
    var cellSize = minSize / numCells;
Now we can create a sprite for the game grid, using the grid_ draw function. I am also giving this sprite a name (using setName), so it can easily be accessed later from any function (through wade.getSceneObject).
    var gridSprite = new Sprite();
    gridSprite.setSize(minSize, minSize);
    gridSprite.setDrawFunction(wade.drawFunctions.grid_(numCells, numCells, 'white', 3));
    var grid = new SceneObject(gridSprite);
    grid.numCells = numCells;
    grid.setName('grid');
    wade.addSceneObject(grid);
We can start to think about the dots on the grid now. What colors do we want to use? Let's define an array of colors at the top of our App function:
var colors = ['', 'green', 'red', 'blue', 'yellow', 'orange', 'purple'];
And before creating the dots, let's add a couple more functions to App, so that we can easily convert grid coordinates into world (i.e. screen) coordinates, and the other way around:
    this.worldToGrid = function(x, y)
    {
        var grid = wade.getSceneObject('grid');
        var pos = grid.getPosition();
        var size = grid.getSprite().getSize();
        var gridX = Math.floor((x - (pos.x - size.x / 2)) / (size.x / grid.numCells));
        var gridY = Math.floor((y - (pos.y - size.y / 2)) / (size.y / grid.numCells));
        return {x: gridX, y: gridY, valid: (gridX >=0 && gridY >=0 && gridX < grid.numCells && gridY < grid.numCells)};
    };

    this.gridToWorld = function(x, y)
    {
        var grid = wade.getSceneObject('grid');
        var pos = grid.getPosition();
        var size = grid.getSprite().getSize();
        var worldX = (x + 0.5) * size.x / grid.numCells + pos.x - size.x / 2;
        var worldY = (y + 0.5) * size.y / grid.numCells + pos.y - size.y / 2;
        return {x: worldX, y: worldY};
    };
Ok now in the startLevel function, after creating the grid, we can add some colored dots:
    // add dots
    for (var i=0; i < numCells; i++)
    {
        for (var j=0; j < numCells; j++)
        {
            var colorId = levelData[j][i];
            if (colorId)
            {
                var dotSprite = new Sprite();
                var dotSize = cellSize * 0.9;
                var dotPosition = this.gridToWorld(j, i);
                dotSprite.setSize(dotSize, dotSize);
                dotSprite.color = colors[colorId];
                wade.addSceneObject(new SceneObject(dotSprite, 0, dotPosition.x, dotPosition.y));
            }
        }
    }
Now there is the question of how we are going to draw these dots. There are several possible ways (an actual image, a predefined draw function, etc.) but this is a good time to show you how to create a custom draw function. WADE is so flexible that it gives you access to the html5 rendering context directly, and you can use it to do some very low-level stuff if you like. This is precisely what we are going to do now, to draw a colored circle: we create our own draw function (that is passed the current context), we save the properties of the context that we are going to change (the fillStyle in this case), we draw our circle using the arc and fill functions of the context, and finally we restore the fillStyle of the context to whatever it was before.
    dotSprite.setDrawFunction(function(context)
    {
        var pos = this.getPosition();
        var size = this.getSize();
        var fillStyle = context.fillStyle;
        context.fillStyle = this.color;
        context.beginPath();
        context.moveTo(pos.x, pos.y);
        context.arc(pos.x, pos.y, size.x / 2, 0, Math.PI * 2, false);
        context.fill();
        context.fillStyle = fillStyle;
    });
Of course this is a pretty basic example of a custom draw function, but it's enough to show you the basic principles: you are given the current rendering context and you can do whatever you like with it; just be sure to restore it to its previous state when you are finished. For a comprehensive list of things that you can do with the rendering context, see here.
Before moving on, we should again consider what happens when the screen is resized. The background gradient is set to resize automatically, but everything else isn't. We could do the same thing for all the objects, but it's possibly getting a bit too complicated, and to be honest I don't think anyone is going to resize the window while playing. But if they do, we still want the game to work, so we are going to implement the quickest solution here: we are going to set a minimum screen size, so that if the screen is set to be smaller than the grid size, the grid (and all its contents) will be scaled down automatically. On the other hand, we are not going to set a maximum screen size, so if the screen becomes larger at this point, it will just be filled with our background gradient. So in our startLevel function:
wade.setMinScreenSize(minSize, minSize);
And we want to undo this when we go back to the main menu (although it isn't possible right now, but it will happen when we can complete a level). So in createMainMenu:
wade.setMinScreenSize(0, 0);
Now try to resize your browser's window while the grid is on the screen, and it should work as expected.
5. Drawing lines
It's time to make our game more interactive. To do this, we are going to create some objects that represent the lines (drawn by our players) that connect the dots. At the top of the App function I am going to create a new array:
var lines = [];
Then in the startLevel function we set up these lines, by creating sprites that are as big as the game grid. This is an important point: we are going to use custom draw functions for these sprites, but we still have to tell WADE how big each sprite is, so it can set its bounding box. This is used by WADE to optimize the drawing (so it knows which areas of the screen have changed and need updating), and it is important that the size that we set reflects the actual size of the object that we are going to draw. In fact, it's really important that the size that we set is at least as big as the size of the object that we draw, if it's a bit bigger it's still OK (although not exactly optimal), but if it's smaller, then you can get visual artifacts in your game.
    // set up line objects
    lines.length = 0;
    for (i=1; i < levelData.length + 1; i++)
    {
        var lineSprite = new Sprite();
        lineSprite.setSize(minSize, minSize);
        var lineObject = new SceneObject(lineSprite);

        wade.addSceneObject(lineObject);
        lines[i] = lineObject;
    }
Now we have to define our custom draw function for these line sprites. Let's say that we assign a set of points to each sprite, and then draw a line that connects these points. We can store the points in an array inside the lineObject itself, so we create an empty array to start with. It's also a good idea to store the color of the line inside the lineObject, for ease of access:
    lineObject.points = [];
    lineObject.color = colors[i+1];
And our custom draw function to connect these points will look like this:
    lineSprite.setDrawFunction(function(context)
    {
        var points = this.getSceneObject().points;
        var color = this.getSceneObject().color;
        if (points.length)
        {
            // store context properties that we are going to change
            var lineWidth = context.lineWidth;
            var strokeStyle = context.strokeStyle;
            var lineCap = context.lineCap;
            var lineJoin = context.lineJoin;

            // set new context properties
            context.lineWidth = cellSize / 3;
            context.strokeStyle = color;
            context.lineCap = context.lineJoin = 'round';

            // draw line
            context.beginPath();
            var worldPoint = wade.app.gridToWorld(points[0].x, points[0].y);
            context.moveTo(worldPoint.x, worldPoint.y);
            for (var i=1; i < points.length; i++)
            {
                worldPoint = wade.app.gridToWorld(points[i].x, points[i].y);
                context.lineTo(worldPoint.x, worldPoint.y);
            }
            context.stroke();

            // restore context properties
            context.lineWidth = lineWidth;
            context.strokeStyle = strokeStyle;
            context.lineCap = lineCap;
            context.lineJoin = lineJoin;
        }
    });
Now let's add some points to see what it's looking like. First of all, we need to know which line the user is drawing, so let's add one more variable at the top of our App function:
var currentLineId;
We also want to set up an array to store our grid state. While the levelData array tells us where the dots are, now that we are going to draw lines, we also want to know which grid cells contain lines, and which lines they are.
var gridLines = [];
We set this up in the startLevel function, by creating an (initially empty) bi-dimensional array:
    // set up the state of the lines on the grid
    for (i=0; i < levelData.length; i++)
    {
        gridLines[i] = [];
    }
Then we add an onMouseDown function for our app, to handle mouseDown events. In this function we check whether we are in the correct game state (playing), and we calculate the grid coordinates that correspond to the mouse event. If they are valid coordinates, and the level data says that there is a dot in that position, we change the currentLineId. We also update our gridLines array, by storing the currentLineId at the current location:
    this.onMouseDown = function(eventData)
    {
        if (gameState == 'playing')
        {
            var gridCoords = this.worldToGrid(eventData.screenPosition.x, eventData.screenPosition.y);
            if (gridCoords.valid && this.levelData[gridCoords.x][gridCoords.y])
            {
                currentLineId = this.levelData[gridCoords.x][gridCoords.y];
                lines[currentLineId].points = [gridCoords];
            }
        }
        else
        {
            currentLineId = 0;
        }
    };
Then as the mouse moves (if the button is still down), we add points to our array, as well as updating our gridLines, to keep track of what's going on in our game grid:
    this.onMouseMove = function(eventData)
    {
        if (gameState == 'playing' && wade.isMouseDown())
        {
            var gridCoords = this.worldToGrid(eventData.screenPosition.x, eventData.screenPosition.y);
            if (gridCoords.valid && currentLineId && !this.levelData[gridCoords.x][gridCoords.y] && !gridLines[gridCoords.x][gridCoords.y])
            {
                lines[currentLineId].points.push(gridCoords);
                gridLines[gridCoords.x][gridCoords.y] = currentLineId;
                lines[currentLineId].getSprite().setDirtyArea();
            }
        }
    };
Note (and this is very important), that I am calling setDirtyArea after updating the points array. This is because changing the points array means that our sprite needs to be redrawn, because it's changed. WADE doesn't know this unless we tell it (and this is precisely what we are doing by caling setDirtyArea). If we didn't do this, WADE would think that our sprite hasn't changed, so it wouldn't bother redrawing it, to improve our App's performance.
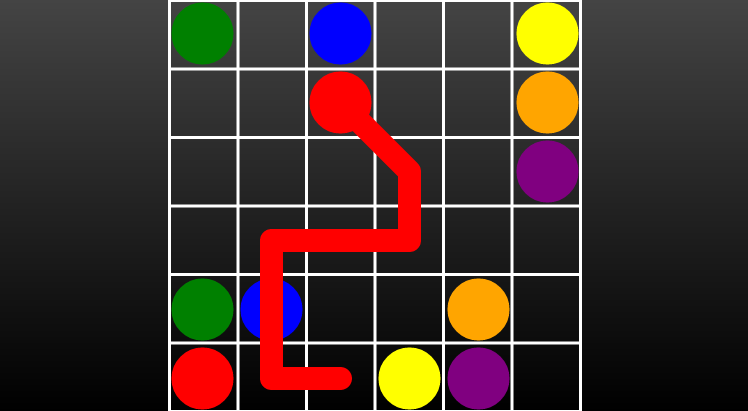
If you try the game now, you'll see that you are able to draw lines, but there are still some problems (as illustrated by the picture below), which we are going to address in a minute.
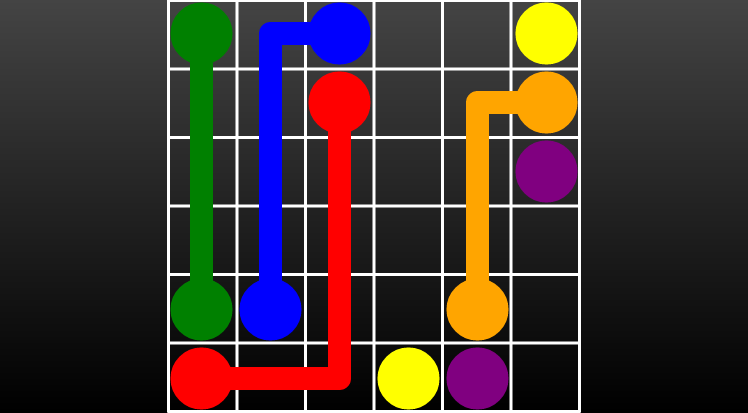
6. Connecting the dots
In reality, the logic that controls whether or not we can add a new point to our lines needs to be quite a bit more complicated than what it is now. Nothing to do with WADE, it's just the way this type of game works. Most of the things that we need to change are in our onMouseMove function. In fact, let's rewrite it taking into account all the restrictions that we need to enforce. First of all, if the mouse is moving outside the grid, we need to invalidate the currentLineId: this is to prevent layers drawing a line, moving their mouse outside the grid, and re-entering the grid somewhere else. We also want an early-exit from the onMouseMove function is the currentLineId is 0. So:
    if (!gridCoords.valid || !currentLineId)
    {
        currentLineId = 0;
        return;
    }
If we haven't changed cell at all since the last point was added to our array, we want to return too.
    // have we moved to a new cell at all?
    var points = lines[currentLineId].points;
    if (points[points.length-1].x == gridCoords.x && points[points.length-1].y == gridCoords.y)
    {
        return;
    }
Now let's consider what happens when the player moves the mouse on a cell that contains a line already. If the line is the same color as the line that we are drawing, it would be sensible to just undo all the drawing of our line up to that point, like this:
    // are we intersecting the same line? If so, remove all the points of the line after this point
    var points = lines[currentLineId].points;
    if (gridLines[gridCoords.x][gridCoords.y] == currentLineId)
    {
        for (var i=0; i < points.length; i++)
        {
            var p = points[i];
            if (p.x == gridCoords.x && p.y == gridCoords.y)
            {
                for (var j=i+1; j < points.length; j++)
                {
                    gridLines[points[j].x][points[j].y] = 0;
                }
                points.length = i+1;
                lines[currentLineId].getSprite().setDirtyArea();
                return;
            }
        }
    }
On the other hand, if there is a line on the grid at the new coordinates, and it is a different color, we don't want to add a new point:
    else if (gridLines[gridCoords.x][gridCoords.y])
    {
        return;
    }
Next we want to make sure that we avoid diagonal lines, by looking at the difference between the current coordinates and the last point in the line: if they're both non-zero, it's a diagonal line, and we don't want it.
    // avoid diagonals
    var dx = points[points.length-1].x - gridCoords.x;
    var dy = points[points.length-1].y - gridCoords.y;
    if (dx && dy)
    {
        return;
    }
If there is a dot at the new position, and it isn't the same color as the line we're drawing, we can't add a point.
    // check for dots at the new coordinates
    var dot = this.levelData[gridCoords.x][gridCoords.y];
    if (dot && dot != currentLineId)
    {
        return;
    }
There is one more thing to check. Even if we have passed all these tests, it is possible that we don't have a valid line. If the distance between the new coordinates and the previous point is greater than one, it is possible that we have moved our mouse so quickly that the mouseDown event didn't fire when it was over a particular cell. This is potentially fine, but only if there is nothing between the previous point and the new one; in this case, we just need to add the intermediate points to our arrays as well.
    // have we moved too much?
    var invalid = false;
    if (Math.abs(dx) > 1)
    {
        var signX = dx > 0? 1 : -1;
        for (i=1; i < Math.abs(dx) && !invalid; i++)
        {
            invalid = this.levelData[gridCoords.x + signX * i][gridCoords.y] || gridLines[gridCoords.x + signX * i][gridCoords.y];
        }
        if (invalid)
        {
            return;
        }
        else
        {
            for (i=1; i < Math.abs(dx); i++)
            {
                points.push({x: gridCoords.x + signX * i, y: gridCoords.y});
                gridLines[gridCoords.x + signX * i][gridCoords.y] = currentLineId;
            }
        }
    }
    else if (Math.abs(dy) > 1)
    {
        var signY = dy > 0? 1 : -1;
        for (i=1; i < Math.abs(dy) && !invalid; i++)
        {
            invalid = this.levelData[gridCoords.x][gridCoords.y + signY * i] || gridLines[gridCoords.x][gridCoords.y + signY * i];
        }
        if (invalid)
        {
            return;
        }
        else
        {
            for (i=1; i < Math.abs(dy); i++)
            {
                points.push({x: gridCoords.x, y: gridCoords.y + signY * i});
                gridLines[gridCoords.x][gridCoords.y + signY * i] = currentLineId;
            }
        }
    }
And if we have passed all these tests, we can add our point to the points array, to the gridLines array, and update our sprite:
    // all good, let's add a new point
    points.push(gridCoords);
    gridLines[gridCoords.x][gridCoords.y] = currentLineId;
    lines[currentLineId].getSprite().setDirtyArea();
Now we want to update our onMouseDown function too, so if you have left a line open (without connecting two dots) you can still go back to it and continue from where you left. So instead of looking for dots only, we look for dots and line segments at the mouse position. If it's a line segment, we "cut" the corresponding line up to that point. This is pretty much the same thing that we just did in our onMouseMove function. Also, if you click on a line, that line should no longer be flagged as connected.
    this.onMouseDown = function(eventData)
    {
        if (gameState == 'playing')
        {
            var gridCoords = this.worldToGrid(eventData.screenPosition.x, eventData.screenPosition.y);
            if (!gridCoords.valid)
            {
                currentLineId = 0;
            }
            else if (this.levelData[gridCoords.x][gridCoords.y])                // is it a dot?
            {
                currentLineId = this.levelData[gridCoords.x][gridCoords.y];
                lines[currentLineId].points = [gridCoords];
                lines[currentLineId].connected = false;
                gridLines[gridCoords.x][gridCoords.y] = currentLineId;
                lines[currentLineId].getSprite().setDirtyArea();
            }
            else if (gridLines[gridCoords.x][gridCoords.y])                     // is it a line segment?
            {
                currentLineId = gridLines[gridCoords.x][gridCoords.y];
                lines[currentLineId].connected = false;
                var points = lines[currentLineId].points;
                for (var i=0; i < points.length; i++)
                {
                    if (points[i].x == gridCoords.x && points[i].y == gridCoords.y)
                    {
                        for (var j=i+1; j < points.length; j++)
                        {
                            gridLines[points[j].x][points[j].y] = 0;
                        }
                        points.length = i+1;
                        lines[currentLineId].getSprite().setDirtyArea();
                    }
                }
            }
        }
    };
There is still a small problem though: when the player clicks on a dot, at the moment we are just creatng a new points array for that particular color. This is not enough, because it may be that a line for that color already exists, and if it does, the corresponding elements of the gridLines array will be set to that line Id. So let's fix this:
    else if (this.levelData[gridCoords.x][gridCoords.y])                // is it a dot?
    {
        currentLineId = this.levelData[gridCoords.x][gridCoords.y];
        if (lines[currentLineId].points)
        {
            for (var k=0; k < lines[currentLineId].points.length; k++)
            {
                var p = lines[currentLineId].points[k];
                gridLines[p.x][p.y] = 0;
            }
        }
        lines[currentLineId].points = [gridCoords];
        gridLines[gridCoords.x][gridCoords.y] = currentLineId;
        lines[currentLineId].getSprite().setDirtyArea();
    }
There isn't much left to do here, except that we want to keep track of which lines are complete. When we establish a connection between two dots, we should set a flag on the corresponding lineObject, and check if all the lines are complete. Because if they all are, we have finished the level and should go back to the main menu. So at the end of onMouseMove:
    // did we just make a connection?
    if (dot == currentLineId)
    {
        lines[currentLineId].connected  = true;
        currentLineId = 0;
        // do we have all the connections that we need?
        for (i=1; i < lines.length; i++)
        {
            if (!lines[i].connected)
            {
                return;
            }
        }
        // go back to the main menu after 1 second
        gameState = 'finished';
        setTimeout(function()
        {
            wade.clearScene();
            wade.app.createMainMenu();
        }, 1000);
    }
7. Level progression
The game is fully working now, but we've only got one level. Creating more levels is trivial and, since we are decided not to hard-code the number 6 (the size of the array) into our App, we are free to use any grid size that we like: we can simply create any NxN array (with N different colors) in our JSON files, and it will just work. I have just created 9 6x6 levels for simplicity, if you want to download them they're together with the rest of the source code for this sample.
But the game is far more interesting if we give our players a sense of progression. We are going to lock the game levels until the player has successfully completed all the previous levels. To do so, we are going to create a new variable at the top of the App function, like this:
var completedLevels = 0;
Then when we create our main menu, we check whether each level is unlocked and store a flag in the corresponding button object:
button.unlocked = (completedLevels >= button.levelId - 1);
For buttons that are locked, we want to add a lock icon rather than some text. We are going to do this with vector graphics again, by adding two sprites: a rectangle, and half a circle. For the rectangle we are going to use a predefined draw function (soldiFill_), while for the half-circle we are going to define our own custom draw function again:
    if (!button.unlocked)
    {
        // create a lock icon - a rectangle first
        var rectangle = new Sprite();
        rectangle.setSize(buttonSize * 0.6, buttonSize * 0.4);
        rectangle.setDrawFunction(wade.drawFunctions.solidFill_('#88f'));
        button.addSprite(rectangle, {y: buttonSize * 0.13});

        // then half a circle
        var halfCircle = new Sprite();
        halfCircle.setSize(buttonSize, buttonSize);
        halfCircle.setDrawFunction(function(context)
        {
            var pos = this.getPosition();
            var radius = buttonSize / 4.5;
            var strokeStyle = context.strokeStyle;
            var lineWidth = context.lineWidth;
            context.beginPath();
            context.moveTo(pos.x - radius, pos.y);
            context.strokeStyle = '#88f';
            context.lineWidth = buttonSize / 10;
            context.arc(pos.x, pos.y, radius, Math.PI, 2 * Math.PI, false);
            context.stroke();
            context.strokeStyle = strokeStyle;
            context.lineWidth = lineWidth;
        });
        button.addSprite(halfCircle, {y: -buttonSize  / 20});
    }
    else
    {
        // add text to show which level the button is for
        var levelText = new TextSprite(button.levelId, (buttonSize / 2) + 'px Arial', 'blue', 'center');
        button.addSprite(levelText, {x:0, y: buttonSize / 6});
    }
By now you should know what I'm doing here with our custom draw function. It isn't the best-looking lock ever, but it serves its purpose. Now, obviously, we want to stop the player selecting a locked level, so at the top of the button's onMouseUp function:
    if (!this.unlocked)
    {
        return;
    }
We also want to be able to unlock new levels, so when we start a level, we store the level id. At the top of the loadLevel function:
this.currentLevelId = levelId;
And when we complete a level (at the bottom of our onMouseMove function, where we change the gameState to 'finished'):
completedLevels = Math.max(completedLevels, this.currentLevelId);
While this works, when the player refreshes the page (or navigates away from the page), we are back to square one, quite literally. If we save this completedLevels variable into the local storage instead, we can keep it across different gaming sessions. So let's do it:
wade.storeLocalObject('flowLevelProgression', {completedLevels: completedLevels});
And in the init function, we load this variable from the local storage:
    var levelProgression = wade.retrieveLocalObject('flowLevelProgression');
    completedLevels = (levelProgression && levelProgression.completedLevels) || 0;
Now play a level, refresh your browser and there you go: your progress hasn't been lost, you can continue from where you left.
This is it for this sample game, I hope you found it useful. Of course there are simpler ways of creating the same type of game, but here we've used exclusively vector graphics, and we have employed several different strategies to make sure that our game looks the best in all possible resolutions. If you want to download the full source code, get it here.

