
If you know me, you know that I'm really into this thing of faking 3D effects on 2D pictures lately. And I'm also a big fan of procedural noise.
Which is why today I want to look into adding some nice noise-based scrolling clouds (with perspective!) to a static 2D image, with a simple GLSL shader. Simple but cool, right? Look:
In reality this is going to be the background part of the main menu of a game that I've been working on. So in this instance, I can't give you permission to use these assets for your own game - however do feel free to use the code or change it as you like for your own needs.
Let's tackle the perspective problem first. I am going to use an image such as this one, with a regular pattern, to better illustrate the simple maths that's involved.

I'm going to use WADE to quickly create a scene that contains this checkered picture and this other picture to display above it.

This is going to represent the ground plane. The checkered pattern will eventually be replaced by our clouds. So when you put them both together, you end up with something like this:

So it's obvious that we cannot simply replace our checkered pattern with a flat picture of some clouds - we need perspective. But how do we fake it?
It's actually quite simple, but to make things even simpler allow me to rescale the horizontal texture coordinates first. As you know, by default texture coordinates vary from (0,0) in the top-left corner, to (1,1) in the bottom-right corner. Now we don't really care about the vertical axis; to make our calculations simpler though, I want the horizontal axis to vary between -1 and 1, so that the centre is 0. This is easily done by editing the sprite's shader like this (note that it only works because our checkered.png image is a power-of two, otherwise we wouldn't get the uv wrapping):
vec2 uv = uvAlphaTime.xy;
uv.x *= 2.;
uv.x -= 1.;
vec4 color = texture2D(uDiffuseSampler, uv);
gl_FragColor = color;
Now let's focus on the cloud plane. The top part of it is supposed to be closer to the viewer - the bottom part of it should be really quite far away. Obviously the exact maths will depend on the type of perspective that you want to use, but generally speaking, depth is going to be a value that varies exponentially with respect to the vertical texture coordinate. Therefore, one thing that we need to do to achieve some sense of perspective, it to exponentiate our uv.y value, so that our shader now looks like this:
vec2 uv = uvAlphaTime.xy;
uv.y = exp(uv.y);
uv.x *= 2.;
uv.x -= 1.;
vec4 color = texture2D(uDiffuseSampler, uv);
gl_FragColor = color;

Now it's worth noting that exp(uv.y) is roughly equivalent to pow(2.72, uv.y), and in reality there is no reason why we should use 2.72 and not any other number. Changing this number will just change the type of perspective, so depending on what you are after, you may want to use a different value here.
This takes care of the vertical perspective, but we also need to do something similar to our horizontal texture coordinate. This can be achieved by simply multiplying uv.x by uv.y (because uv.y is now an exponential quantity, and because we rescaled uv.x so that 0 would be in the middle of the screen).
vec2 uv = uvAlphaTime.xy;
uv.y = exp(uv.y);
uv.x *= 2.;
uv.x -= 1.;
uv.x *= uv.y;
vec4 color = texture2D(uDiffuseSampler, uv);
gl_FragColor = color;

Now to make things more interesting we throw a time factor into the mix: by subtracting a time-dependent value from our vertical texture coordinate, it will appear to scroll downwards. Remember to select the Always Draw option for your sprite in WADE, otherwise you won't see it animating. Here's the shader so far:
vec2 uv = uvAlphaTime.xy;
uv.y = exp(uv.y);
uv.x *= 2.;
uv.x -= 1.;
uv.x *= uv.y;
uv.y -= uvAlphaTime.w * 0.1;
vec4 color = texture2D(uDiffuseSampler, uv);
gl_FragColor = color;
Now it's time to get rid of this boring black and white pattern, and replace it with something that looks a bit more like clouds. Like I said above, I will use some procedural noise for this.
There are 2 ways of doing it: you could do it all in code, or use GIMP to generate some tileable perly noise. In fact there is also a 3rd way if you're really lazy (and I am): just recycle one of the procedural noise textures that we've used in a previous blog post, such as this one:

This is made of 3 layers of noise (the red, green and alpha channels), and it's also got a flame shape in the blue channel because we were using it for a fire effect, but that's irrelevant here - we won't use the blue channel. After all we don't need so many layers of noise, 3 are enough.
Let's start by defining two constant vectors: one for the sky color, and one for the light color:
const vec3 skyColor = vec3(0.5, 0.5, 1.0);
const vec3 lightColor = vec3(1.0, 0.7, 0.7);
After applying our perspective transformation to the texture coordinates, we want to use our noise texture (specifically I'm going to use the green channel of it) to decide, for each pixel, whether we want to show the clouds or the sky. Let's assume, just for a moment, that the clouds will be a solid, flat white color. The shader code to do this will be something like the following:
vec4 noise0 = texture2D(uDiffuseSampler, uv);
vec4 color;
color.xyz = vec3(1.);
color.xyz = mix(color.xyz, skyColor, noise0.y);
color.w = 1.;
If we want to make it more interesting, instead of using flat white clouds, we could use another channel of our noise texture (say the red one) to modulate the cloud color, mixing white and the light color that we defined above:
vec4 noise0 = texture2D(uDiffuseSampler, uv);
vec4 color;
color.xyz = lightColor * noise0.x + (1. - noise0.x);
color.xyz = mix(color.xyz, skyColor, noise0.y);
color.w = 1.;
We are getting there, but to make it look better we really shouldn't use a flat color for the sky. Flat is boring. I want to use a separate texture for the sky instead, and it's going to be this one here:

Three things you need to do if you want to add this texture to your WADE project: first, drag it into the editor so it becomes part of your assets for this project; second, add it to the list of images for the current scene:

And third, add a shader uniform to your sprite, pointing it to this texture:

It's looking much more interesting now, but to add some more depth to the overall effect, we will do a simple parallax trick: we repeat the same process again, with a different set of texture coordinates, to generate a second cloud layer. The only difference is that for this second cloud layer, the time factor is going to have a different value, giving the illusion that clouds are moving slower, and also that they're moving horizontally a bit. I am also going to use a different channel of the noise texture (the alpha channel that we haven't used so far), as to avoid any visible repetitions of the noise pattern. We then combine everything together into the final result. Here's the complete shader for our sky:
const vec3 skyColor = vec3(0.5, 0.5, 1.0);
const vec3 hazeColor = vec3(0.99, 0.75, 0.52);
const vec3 lightColor = vec3(1.0, 0.7, 0.7);
vec2 uv = uvAlphaTime.xy;

vec3 backColor = mix(skyColor, hazeColor, pow(uv.y, 3.));

uv.y = exp(uv.y);
uv.x *= 2.;
uv.x -= 1.;
uv.x *= uv.y;
uv.y -= uvAlphaTime.w * 0.1;
vec4 noise0 = texture2D(uDiffuseSampler, uv);
vec4 color, color0, color1;
color0.xyz = lightColor * noise0.x + (1. - noise0.x);
color0.w = noise0.y;

uv.y += uvAlphaTime.w * 0.035;
uv.x += uvAlphaTime.w * 0.04;
vec4 noise1 = texture2D(uDiffuseSampler, uv);
color1.xyz = lightColor * noise1.w + (1. - noise1.w);
color1.w = noise1.y;
color = mix(color0, color1, color0.w);

color.xyz = mix(color.xyz, backColor, 1.0 - color.w);
color.w = 1.;

gl_FragColor = color;
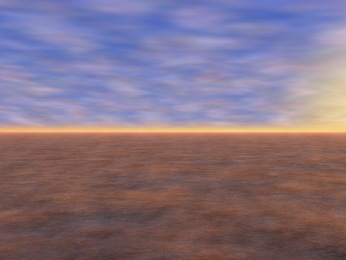
With this shader the sky looks pretty cool, but we need to do something for the bottom part of the screen, as moving clouds would normally cast moving shadows. Luckily this is pretty simple, it's just a case of subtracting some of the color from the ground plane, based on our cloud texture. And the cloud texture is not as complicated as it was for the sky. I mean, it's a very similar thing, but we don't need to worry too much about getting the perspective right, or using parallax tricks - as long as there's some noise that appears to be scrolling in the right direction, and is not flat but does have some kind of exponential relationship with the vertical screen coordinate, the effect will be believable enough to most people. So here's the shader that I ended up using on the ground.
vec2 uv = uvAlphaTime.xy;
vec4 color = texture2D(uDiffuseSampler, uv);
float f = sqrt(uv.y);
uv.y = 1. - uv.y;
uv.y = exp(uv.y);
uv.x *= 2.;
uv.x -= 1.;
uv.x *= uv.y;
uv.y -= uvAlphaTime.w * 0.1;
vec4 noise = texture2D(noiseTexture, uv);
color.xyz = clamp(color.xyz - noise.xxx * 0.2 * f, 0. ,1.);
gl_FragColor = color;
Nice and simple! Now you know I'm never happy and can spend days tweaking numbers - is the cloud pattern really OK as it is, or would it be better if we scaled the texture coordinates a bit? Are shadows too faint? Is the sun too yellow? What about using different light colors for the 2 cloud layers? And I could go on... but I won't do that here. Instead, if you want to look at all the final tweaks, download the full WADE project and play with it a bit. I hope you enjoy :)

