
In this post, we will be making a very simple tiled map, using 4 tiles contained in a singlee image. The map will be 3 by 3 tiles. Control the white square in the map below with arrow keys. This is what we will be making.
Setting Up
Although tilemaps have been added to Wade, we have not yet completed the tilemap editor, and so it is not included in this release, but all the core tilemap code exists. You could do this by modifying app.js in the editor, or you could do this the old fashioned way which we will explain in this post. We will download wade and write our app locally, hosting it using promptjs. This is how all wade apps were made before the online editor existed.
You can download Wade and PromptJS from here. PromptJS needs to be installed, however the wade download itself requires no installation, simply unzip it, we will add our own files to it and modify some of the existing ones. If you are not on windows, or just don't want to install promptJS, an alternative is python's SimpleHTTPServer. Simply open a terminal and type "python -m SimpleHTTPServer 1234". All we want to do is serve the files contained in our unzipped wade folder.

If you open index.html, you will see a commented out line "// wade.init('test.js');". Remove the two forward slashes to uncomment the line, and change test.js to app.js. Now we need to create our app.js file in this same directory. This is the file that we create our program in. Create the file and copy the following code into it.
App = function()
{
    this.load = function()
    {
    };

    this.init = function()
    {
    }:
};
Wade first calls the load function. Once all assets are loaded, init is called. This template of course contains empty functions. We are going to fill it with out tilemap code. First we need to load
an image that contains our tiles. For this simple example I created a 256x256 image with 4 tiles, each 128x128. This keeps this post simple, and makes the uv co-ordinates easy to calculate. To load
the image, I simply need to add "wade.loadImage("tiles.png");" inside the load function.
Creating the Terrain
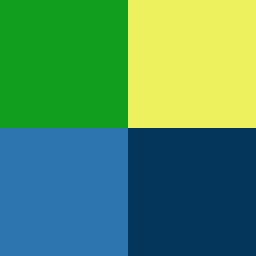
Now that we have our image loaded, we need to define our map and our tiles. The first step is to create an array that specifies which tile is which. I’m going to make a 3 by 3 map, so we need an array 9 elements long. Each successive group of 3 elements represents a row in our map. Here is the hard coded example I’m using, notice the indentation. While it makes no difference, I structured it to appear in code how it will appear in the world. The top left is grass, the bottom right is the sea, and there is a thin line of beach in between.
var myMap = ["grass", "grass", "sand" ,
             "grass", "sand" , "water",
             "sand" , "water", "ocean"];
So, we have defined an array of id’s that defines our map. Now we need to tell wade what a “grass” tile is. We do this by defining a templates object. For each id we define in our map array, we need an object that describes it. Here you can see my array of four templates, remember we have 4 images in our larger image we loaded before. Notice the collision true flags for water and ocean. This will matter later when we add our character as our character is not the messiah and therefore can not walk on water.
var tileTemplates =
{
    "grass":{
        "scale": 1,
        "name": "grass",
        "texture": "tiles.png",
        "collision": false,
        "rotation": 0,
        "type": "terrain tile",
        "imageArea": {
            "minX": 0.0,
            "minY": 0.0,
            "maxX": 0.5,
            "maxY": 0.5
        }
    },
    "sand":{
        "scale": 1,
        "name": "sand",
        "texture": "tiles.png",
        "collision": false,
        "rotation": 0,
        "type": "terrain tile",
        "imageArea": {
            "minX": 0.5,
            "minY": 0.0,
            "maxX": 1.0,
            "maxY": 0.5
        }
    },
    "water":{
        "scale": 1,
        "name": "water",
        "texture": "tiles.png",
        "collision": true,
        "rotation": 0,
        "type": "terrain tile",
        "imageArea": {
            "minX": 0.0,
            "minY": 0.5,
            "maxX": 0.5,
            "maxY": 1.0
        }
    },
    "ocean":{
        "scale": 1,
        "name": "ocean",
        "texture": "tiles.png",
        "collision": true,
        "rotation": 0,
        "type": "terrain tile",
        "imageArea": {
            "minX": 0.5,
            "minY": 0.5,
            "maxX": 1.0,
            "maxY": 1.0
        }
    }
};
I will briefly mention the imageArea object present in each of those templates. This specifies the min and max values in UV co-ordinates. UV co-ordinates range from 0 to 1. The top left of any image is (0,0) while the bottom right is (1,1). So, for our image that contains 4 tiles, each taking up half the image width and height, it should be clear that the size of our individual tiles is 0.5 wide and 0.5 tall. If we simply left these as 0, 0, 1, 1, then each tile would draw our entire image which is not what we want. We only care about the part of the image that represents say our grass tile. In short imageArea is the part of the larger image that we wish to render for a given tile.
Finally, we can initialize our map by providing the map size and the tile size to the tilemap init function. We then call setTiles and pass in our map array and our templates. This is what it looks like in code.
wade.tilemap.init(
{
    numTiles:{x:3, y:3},
    tileSize:{x:128, y:128}
});
wade.tilemap.setTiles(myMap, tileTemplates);
We now have all the code we need to render our tilemap. Assuming you installed promptjs, run it and navigate to your project directory. Type “server 1234”. This will host a server on port 1234 allowing you to test your wade apps properly . Now open a browser, and in the address bar type localhost:1234/index.html. If all goes well, you should see your wade app, and it should look something like this.

For larger maps, you may want to store these maps and tile templates in json and load them in at the start of the app.
Adding a Character
The final thing we want is a controllable character. There is now a new behavior called “TilemapCharacter”. To keep things simple, our character is just going to be a procedural square sprite that we will control with the arrow keys. I will create it in a closure to prevent cluttering up the init function scope with random variables.
var character = (function()
{
    var sprite = new Sprite("procedural_square");
    sprite.setSize(64, 64);
    var obj = new SceneObject(sprite);
    var behaviour = obj.addBehavior(TilemapCharacter);
    behaviour.automaticRotations = false;
    behaviour.drawCollisionBox = false;
    return wade.addSceneObject(obj, true);
})();
The tilemap character has a lot more functionality than we can see here. You can set destinations and have it path find to a tile on the map. You can also specify animations to play when moving different directions. The documentation explains all of these options in detail. Once the tilemap editor is released, we look forward to seeing what you all make with this.
Here is a link to my app.js file which contains all the code in this blog post.

