
While textures, and especially tileable textures, are usually associated with 3D graphics, there are lots of uses for them in 2D games too. Just to name a few examples: you need to find some pictures for your terrain tiles (grass, sand, soil, etc.), or perhaps you want a nice, scrollable picture of a sky with clouds, or you need some animated fire in your game.
Of course you could just draw these textures in Photoshop or Gimp, but that takes some artistic skills, time and dedication. You end up with some .png files that may be visually pleasing, but also potentially big, and you can only have a limited amount of them because each costs time and money to produce and to transfer to your end users.
Luckily there is an alternative: you can use some ingenious maths to generate these textures on the user's machine as and when they are needed. It may sound complex, but it really isn't, as there are some clever people that have already done all the hard work and have come up with some brilliant algorithms. There are several that can be used for this purpose, and in this blog post we'll talk about the famous Perlin Noise algorithm, invented in the 80's by Ken Perlin, an academic from New York University.
There are already many technical articles on the internet describing in great detail how the maths work, so here I'll just give you a quick overview, focusing instead on how to use Perlin's algorithm to generate good looking textures.
I want to pre-emptively apologize if this article looks very technical and not very shiny like the rest of the articles in this blog, but Perlin Noise is a very fundamental building block that we need to master to be able to create very, very shiny things. I will be referencing it many times in future blog posts.
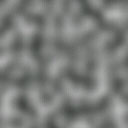
The fundamental idea is that if you just generate some noise with a sequence of random numbers (also known as white noise), it will look very, very grainy and high-frequency. Look at the example below, where for each pixel a random number has been used to determine the brightness:

While this may be useful in some cases, most things that you find in nature (think sand, water, fire, etc.), while noisy, look absolutely nothing like that. To generate pictures of those, we need a much smoother noise algorithm, that won't change values so dramatically between pixels: something that varies smoothly, while still looking random.
Ken Perlin had a brilliant idea to achieve that: let's divide the image into a grid; for each point (node) of the grid, we choose a random gradient, i.e. a vector of unit length that points in a random direction.

For each pixel, we determine what cell it is in. The noise value for that pixels will be influenced by the gradients defined at the 4 corner points of the cell, with the closest one influencing it the most. This ensures that values change smoothly, while the random nature of the gradients also ensures a general random look. You end up with something like this, that can be easily used to generate natural-looking textures:
This can be extended to more dimensions, so you can have 2D noise, 3D noise, 4D noise and so on. The more dimensions you have, the more expensive it gets from a computational standpoint (exponentially). But there are many ways of optimizing this algorithm, using pre-computed random numbers, hashed gradients, and so on. It gets quite technical, but you don't need to worry about that - I'm going to give you a JavaScript implementation of it that just works. It is an implementation of the 3D version of Perlin's algorithm, for reasons that will become clear later on. So instead of generating a square full of noise, you could use this algorithm to generate a cube full of noise. Or always use it with z == 0 to generate plain 2D noise.
This code is inspired by someone else's JavaScript implementation, and I would normally mention where I got this from, but I have modified it quite a bit (to make it faster) and it's been in my own code library for too long - I really can't remember who the original author was, sorry.
We start by pre-calculating some random numbers. This is done so we don't have to call Math.random() too often, and also because we need to always use the same random numbers for the same cells (for consistency), so we need to store them somewhere. In most textbooks, this is called a permutation table, because of the way it's used to generate permutations of predefined gradients.
	var p = [];
	for (var i = 0; i < 256; i++)
	{
		p[i] = Math.floor(Math.random() * 256);
	}
Since most calculations here involve getting the previous and next random numbers, to simplify these calculations we just duplicate the entire random number sequence - it's just so we don't have to worry about the annoying edge cases. You know, when you're on the last point of the grid and try to access the next adjacent point, which doesn't exist so you need to access the first point instead (the so called index wrapping).
	// To remove the need for index wrapping, double the permutation table length
	var perm = [];
	for (i = 0; i < 512; i++)
	{
		perm[i] = p[i & 255];
	}
Next we are going to need a couple of utility functions: one to linearly interpolate between two values (the equivalent of GLSL' mix function):
	// linear interpolation
	var mix = function(a, b, t)
	{
		return (1 - t) * a + t * b;
	};
And another one to generate a smoother interpolation - linear is not good enough if we want values to vary very smoothly. So assuming that we have some value t that varies between 0 and 1, instead of using that value directly we use 6t5-15t4+10t3, also known as an ease curve, to give it that smoother variation as it approaches integer values. If you want to be technical, it's to approach integer values with zero 1st and 2nd order derivatives (image taken from Matt Zucker's blog):

	var fade = function(t)
	{
		return t * t * t * (t * (t * 6 - 15) + 10);
	};
We then need to define our set of possible gradients. These are 3D vectors that point in all possible positive and negative directions. It turns out there are 12 possible ones:
	var grad3 = [[1, 1, 0], [-1, 1, 0], [1, -1, 0], [-1, -1, 0], [1, 0, 1], [-1, 0, 1],
				 [1, 0, -1], [-1, 0, -1], [0, 1, 1], [0, -1, 1], [0, 1, -1], [0, -1, -1]];
And we need a function to compute a dot product of one of these gradients with an arbitrary 3D coordinate defined by x, y and z values. This is needed in the noise calculation, to determine the contribution of each cell corner to the overall noise value of each pixel.
	// a special dot product function used in perlin noise calculations
	var perlinDot = function(g, x, y, z)
	{
		return g[0] * x + g[1] * y + g[2] * z;
	};
That's all we need for now - we are ready to write the main bit, our noise function that, given a set of coordinates, returns a noise value for that point in 3D space.
	var n = function(x, y, z)
	{
		// Find unit grid cell containing point
		var X = Math.floor(x);
		var Y = Math.floor(y);
		var Z = Math.floor(z);

		// Get relative xyz coordinates of point within that cell
		x = x - X;
		y = y - Y;
		z = z - Z;

		// Wrap the integer cells at 255
		X &= 255;
		Y &= 255;
		Z &= 255;

		// Calculate a set of eight hashed gradient indices
		var gi000 = perm[X + perm[Y + perm[Z]]] % 12;
		var gi001 = perm[X + perm[Y + perm[Z + 1]]] % 12;
		var gi010 = perm[X + perm[Y + 1 + perm[Z]]] % 12;
		var gi011 = perm[X + perm[Y + 1 + perm[Z + 1]]] % 12;
		var gi100 = perm[X + 1 + perm[Y + perm[Z]]] % 12;
		var gi101 = perm[X + 1 + perm[Y + perm[Z + 1]]] % 12;
		var gi110 = perm[X + 1 + perm[Y + 1 + perm[Z]]] % 12;
		var gi111 = perm[X + 1 + perm[Y + 1 + perm[Z + 1]]] % 12;

		// Calculate noise contributions from each of the eight corners
		var n000 = perlinDot(grad3[gi000], x, y, z);
		var n100 = perlinDot(grad3[gi100], x - 1, y, z);
		var n010 = perlinDot(grad3[gi010], x, y - 1, z);
		var n110 = perlinDot(grad3[gi110], x - 1, y - 1, z);
		var n001 = perlinDot(grad3[gi001], x, y, z - 1);
		var n101 = perlinDot(grad3[gi101], x - 1, y, z - 1);
		var n011 = perlinDot(grad3[gi011], x, y - 1, z - 1);
		var n111 = perlinDot(grad3[gi111], x - 1, y - 1, z - 1);

		// Compute the ease curve value for each of x, y, z
		var u = fade(x);
		var v = fade(y);
		var w = fade(z);

		// Interpolate (along x) the contributions from each of the corners
		var nx00 = mix(n000, n100, u);
		var nx01 = mix(n001, n101, u);
		var nx10 = mix(n010, n110, u);
		var nx11 = mix(n011, n111, u);

		// Interpolate the four results along y
		var nxy0 = mix(nx00, nx10, v);
		var nxy1 = mix(nx01, nx11, v);

		// Interpolate the last two results along z
		return mix(nxy0, nxy1, w);
	};
Annoyingly this is where most of the technical articles about Perlin Noise stop. You've got your function to generate noise, that's it. But that's such a shame, because this is where the fun begins! It's what we do now with this function that's pretty exciting.
First of all I think we want to see what it does. So let's wrap it up into a "class" that contains all our code above, and exposes one public method called noise. This noise method will just call the n function above for now, but we'll make it more interesting in a minute.
	var NoiseGenerator = function()
	{
		// -------------------
		// all the code above
		// -------------------

		this.noise = function(x, y, z)
		{
			return n(x, y, z);
		};
	};
We are now ready to make a function that actually uses this NoiseGenerator to create a texture. This function will just return a canvas object with our noise.
As you have seen, the Perlin Noise algorithm produces a greyscale image, i.e. it's a single channel of noise. We want to fill our canvas with a base color first, then generate some noise and multiply it by some color, to get a more interesting effect.
var generateTexture = function(size, data)
{
	// create canvas and get its image data (access its pixels directly)
	var canvas = document.createElement('canvas');
	canvas.width = canvas.height = size;
	var context = canvas.getContext('2d');
	var imageDataObject = context.createImageData(size, size);
	var imageData = imageDataObject.data;

	// fill with base color
	for (var i = 0; i < size * size * 4; i += 4)
	{
		imageData[i] = data.baseColor[0];
		imageData[i + 1] = data.baseColor[1];
		imageData[i + 2] = data.baseColor[2];
		imageData[i + 3] = data.baseColor[3];
	}

	// add noise
	var n = new NoiseGenerator();
	var p = 0;
	for (var y = 0; y < size; y++)
	{
		for (var x = 0; x < size; x++)
		{
			// generate noise at current x and y coordinates (z is set to 0)
			var v = Math.abs(n.noise(x / size, y / size, 0));
			for (var c = 0; c < 3; c++, p++)
			{
				// use noiseColor's alpha channel to blend with base color
				imageData[p] = Math.floor(imageData[p] + v * data.noiseColor[c] *  data.noiseColor[3] / 255);
			}
			p++;
		}
	}
	context.putImageData(imageDataObject, 0, 0);
	return canvas;
};
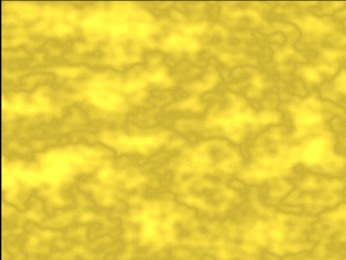
Now we can easily use this canvas to see something on the screen. I am going to start creating a sand texture. Using WADE, I'm going to create a new sprite that uses it, and add it to a SceneObject which I add to the scene:
	var sand = {baseColor: [50,46,14,255], noiseColor: [235, 221, 61, 255]};
	wade.setImage('sand', generateTexture(256, sand));
	var obj = new SceneObject(new Sprite('sand'));
	wade.addSceneObject(obj);

It's looking quite interesting, but of course it's not a good enough representation of sand. But believe it or not, it's quite close because we only need to change our noise function very slightly, to have more control over the appearance of the noise. Let's pass a roughness parameter to our noise generator, as well as an attenuation parameter.
	var NoiseGenerator = function(attenuation, roughness)
	{
	    ....
	};
The roughness parameter will modify the frequency of the noise, simply by rescaling the coordinates. The attenuation parameter is used to simply multiply the noise value, so we can tone it up or down depending on our needs.
	this.noise = function(x, y, z)
	{
		var a = attenuation;
		var f = roughness;
		return n(x * f, y * f, z * f) * a;
	};
Of course we want to modify our generateTexture function to take these into account, but in the interest of brevity I won't do that here because it's just an intermediate step - it's still not quite what we need. With attenuation and roughness, we end up with a more interesting result, but again, it's not good enough just yet:

To achieve what we want, we need to introduce the concept of octaves: an octave of noise is what we've just generated, i.e. it's a noise texture with some roughness and some attenuation. To make noise more interesting, we combine several octaves by repeating this process several time. At each iteration we increase f and decrease a. This means that for each iteration we get noise that is rougher and rougher (higher frequency), but whose contribution to the final picture is less and less important. So our NoiseGenerator constructor looks like this:
	var NoiseGenerator = function(numOctaves, attenuation, roughness, startingOctave)
	{
	    ....
	};
Our noise function needs some minor changes again:
	this.noise = function (x, y, z)
	{
		var a = Math.pow(attenuation, -startingOctave);
		var f = Math.pow(roughness, startingOctave);
		var m = 0;
		for (var i = startingOctave; i < numOctaves + startingOctave; i++)
		{
			m += n(x * f, y * f, z * f) * a;
			a /= attenuation;
			f *= roughness;
		}
		return m / numOctaves;
	};
We are going to change our generateTexture function too of course. But to make it even more interesting, we'll accept not one, but several noise parameters. The idea is that you call generateTexture telling it to add several layers of noise on top of each other. Each layer can have its own color, attenuation, roughness and octave range.
var generateTexture = function (size, data)
{
	var canvas = document.createElement('canvas');
	canvas.width = canvas.height = size;
	var context = canvas.getContext('2d');
	var imageDataObject = context.createImageData(size, size);
	var imageData = imageDataObject.data;
	for (var i = 0; i < size * size * 4; i += 4)
	{
		imageData[i] = data.baseColor[0];
		imageData[i + 1] = data.baseColor[1];
		imageData[i + 2] = data.baseColor[2];
		imageData[i + 3] = data.baseColor[3];
	}
	for (i = 0; i < data.noise.length; i++)
	{
		var k = data.noise[i];
		var n = new NoiseGenerator(k.numOctaves, k.attenuation, k.roughness, k.startingOctave);
		var p = 0;
		for (var y = 0; y < size; y++)
		{
			for (var x = 0; x < size; x++)
			{
				// generate noise at current x and y coordinates (z is set to 0)
				var v = Math.abs(n.noise(x / size, y / size, 0));
				for (var c = 0; c < 3; c++, p++)
				{
					imageData[p] = Math.floor(imageData[p] + v * k.color[c] *  k.color[3] / 255);
				}
				p++;
			}
		}
	}
	context.putImageData(imageDataObject, 0, 0);
	return canvas;
};
The parameters that we need to pass to generateTexture are now a bit more complex, with several possible layers of noise, each with its own color and properties. You can make some cool textures with it. Note that I've spent approximately 3 minutes to find the parameters for the examples below, with a bit more time and dedication I'm sure you can achieve much better results.

	var sand =
	{
		baseColor: [202,177,50,255],
		noise:
		[
			{
				color: [235, 221, 61, 1024],
				attenuation: 1.5,
				roughness: 2,
				numOctaves: 4,
				startingOctave: 2
			},
			{
				color: [255, 255, 255, 255],
				attenuation: 1.5,
				roughness: 6,
				numOctaves: 3,
				startingOctave: 5
			}
		]
	};

	var grass =
	{
		baseColor: [53,161,27,255],
		noise:
		[
			{
				color: [95, 235, 61, 180],
				attenuation: 2,
				roughness: 2,
				numOctaves: 3,
				startingOctave: 2
			},
			{
				color: [200, -60, 0, 2550],
				attenuation: 2,
				roughness: 2,
				numOctaves: 5,
				startingOctave: 2
			}
		]
	};

	var clouds =
	{
		baseColor: [0,0,255,255],
		noise:
		[

			{
				color: [255, 255, 255, 850],
				attenuation: 1.3,
				roughness: 1.4,
				numOctaves: 6,
				startingOctave: 2
			}
		]
	};
Endless possibilities. Do experiment with it a bit, it's fun.
Now you may be wondering why we have implemented a 3D noise function even though we are always calling it with z set to 0, so it's effectively bidimensional. There are a couple of uses for 3D noise even if we are making 2D textures. One of them is animation: you could generate a series of textures with the same parameters but varying z, and you would get a nice animated texture. Remember that we have, essentially, a cube full of noise. A texture is just a slice of this cube. But since the noise varies smoothly in all 3 directions, if you show adjacent slices in sequence you are guaranteed to get a smooth transition.
I won't do an example implementation of animated noise, but I'll describe in some detail the other reason why our 3rd dimension of noise may be useful: to make tileable textures. There is a relatively simple technique (that I borrowed from this guy) that allows you to generate tileable 2D textures from 3D noise, and you can visualize it in this way: we have a cube full of noise; imagine that we take a piece of paper, and fold it so we obtain a cylinder. We then insert this cylinder inside the cube. Because we can always unwrap our piece of paper to transform it back from a cylinder into a rectangle, we can think of the noise that is now on the surface of the cylinder as a 2D texture (the texture that we would obtain by unfolding our piece of paper). This texture, however, must now be tileable along 1 axis, because two edges of our piece of paper are touching each other when it's wrapped.
If that makes sense, you can extend the same reasoning to a torus rather than a cylinder. Unlike the cylinder, the torus can be unwrapped (with two cuts), in a way that lets us obtain a texture that is tileable on both the X and Y axes. So all we have to do is sample our noise cube not at (x, y, 0) for each pixel of our texture like we've been doing, but at the coordinates that correspond to a toroidal surface inside the cube - let's call them (xt, yt, zt). Sounds scary, but in reality it's pretty simple. We calculate xt, yt and zt (just some basic trigonometry), and if we want a wrappable texture we use those coordinates instead of (x, y, 0).
var generateTexture = function (size, data)
{
	var canvas = document.createElement('canvas');
	canvas.width = canvas.height = size;
	var context = canvas.getContext('2d');
	var imageDataObject = context.createImageData(size, size);
	var imageData = imageDataObject.data;
	for (var i = 0; i < size * size * 4; i += 4)
	{
		imageData[i] = data.baseColor[0];
		imageData[i + 1] = data.baseColor[1];
		imageData[i + 2] = data.baseColor[2];
		imageData[i + 3] = data.baseColor[3];
	}
	var twoPi = Math.PI * 2;
	var at = 1;
	var ct = 4;
	for (i = 0; i < data.noise.length; i++)
	{
		var k = data.noise[i];
		var n = new NoiseGenerator(k.numOctaves, k.attenuation, k.roughness, k.startingOctave);
		var p = 0;
		for (var y = 0; y < size; y++)
		{
			for (var x = 0; x < size; x++)
			{
				var xt = (ct + at * Math.cos(twoPi * y / size)) * Math.cos(twoPi * x / size);
				var yt = (ct + at * Math.cos(twoPi * y / size)) * Math.sin(twoPi * x / size);
				var zt = at * Math.sin(twoPi * y / size);
				// generate noise at current x and y coordinates (z is set to 0)
				var v = Math.abs(data.wrap? n.noise(xt, yt, zt) : n.noise(x / size, y / size, 0));
				for (var c = 0; c < 3; c++, p++)
				{
					imageData[p] = Math.floor(imageData[p] + v * k.color[c] *  k.color[3] / 255);
				}
				p++;
			}
		}
	}
	context.putImageData(imageDataObject, 0, 0);
	return canvas;
};
So not as difficult as it may sound - and it works quite well as you can see here:

	var tileableWater =
	{
		baseColor: [0,0,255,255],
		wrap: true,
		noise:
		[

			{
				color: [150, 150, 150, 255],
				attenuation: 1.3,
				roughness: 2,
				numOctaves: 4,
				startingOctave: 0
			},
			{
				color: [80, 80, 80, 255],
				attenuation: 2,
				roughness: 2,
				numOctaves: 4,
				startingOctave: 0
			}
		]
	};
This toroidal projection does add a fair bit of deformation to the final result. It is possible to eliminate it though, with the most promising approach being that of projecting onto a hypersphere in 4 dimensions rather than a 3D torus. However that's getting pretty hardcore, and this is probably enough of an introduction to procedural textures - but do feel free to download the source and expand it a bit. Enjoy!

