
Paths and Tweening
There's a new powerful feature in WADE 3.2 that allows you to easily animate any properties of your scene objects and sprites. Meet the Path tool:

So how does it work? There's a whole new video tutorialabout it, but here's a quick overview. First of all you'll notice that a New Path button has appeared in the left-hand-side panel. Click it and you'll add a new path to the current scene.

A path is made of nodes. By clicking the New Node button or, more conveniently, by pressing N on your keyboard, you'll create a new node. But what exactly is a node?
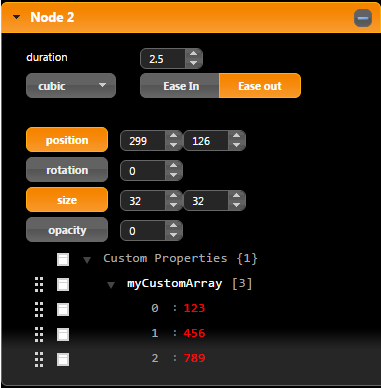
By default a Node defines a position on the path. But it doesn't have to. A node can be used to define any property, not just position: opacity, size, rotation or really anything that you like. You can use the Custom Properties section to add any properties (including arrays and objects) that you want to interpolate between path nodes. These will be applied to any scene objects on the path, and to all of their sprites. For example, this could be used to animate shader uniforms among other things. Remember that only properties that are defined at both the start and end node of each path segment will be interpolated. And you can choose the interpolation method that you like best, choosing from linear, quadratic, exponential and many more, with the ability to select Ease In, Ease Out or both. The visual editor gives you a nice preview of how each interpolation method will work.
After creating a path, all you need to do is go to your SceneObject's Properties tab, and assign it to the path:

When following a path, your SceneObject will receive a new onPathNode event every time it reaches a node.
Of course you could also do all this in code. Check out the Path Documentation if you're interested in how it works.
Full Screen Preview
A new simple but useful feature in 3.2 is the ability to preview your project in full screen. Simply click the Full Screen button on the preview window.

Multiple textures for your custom shaders
You are no longer limited to using a single texture for your custom shaders. As well as the usual uDiffuseSampler, you can now define your own textures as shader uniforms. Just use a sampler2D uniform and enter the name of an image that is currently loaded in wade, and it will be sent to your shader.

Most graphics cards these days are OK with 16 textures active at once. However if you're developing for mobile, try to use 8 or less in any single shader.
UV coordinates for animations
When creating animations, you can now specify UV coordinates that define which portion of the spritesheet to use. This is a very powerful feature that allows you to pack lots of spritesheets into one, giving your game a nice performance boost.
Lots of bits and pieces
We added quite a few other little things to this release of WADE. Not to mention the bugs: we've fixed 20 of them in this release, alongside some stability improvements coming from reduced memory usage in the online editor. Many thanks to all the people that have made us aware of existing issues and who suggested improvements.
If you want to know all about it, check out the change log.
Enjoy the new version and, as usual, let us know if you spot anything that doesn't quite work as it should!

